We are excited to share with you how easy it is to install Facebook pixel and AdWords tag for your website. You will not need to know how to code. You just need to copy and paste.
Facebook Pixel
For the Facebook pixel, you need:
Your website
The ability to update your website’s code
A Facebook Ads Manager account
Facebook Pixel Helper (from Google Chrome web store).
What is a Facebook Pixel?
A facebook pixel is made up of a base code and an event code.
You will need to add these two codes to your website’s code.
The base code is installed on every page of your website’s header. The event code is installed only on site pages that are relevant for your campaign objectives.
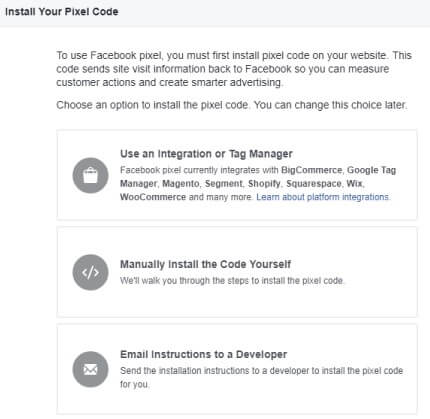
You will need to log in to your Facebook Ads Manager account to begin. Type ‘pixel’ in the search bar, and it will show up in the all-new Events Manager. Here you will find the button to create a pixel.
Give Your Pixel a Name
Each Ads Manager account can only generate a pixel. You will have to upgrade to a Business Managers account to have up to 10 pixels.
Choose a name for your pixel. It can be up to 50 characters and should accurately reflect what your website is.
Click Create
When you click ‘create a pixel’, a base code will be generated. Copy this base code entirely.
You will now see a button ‘set up pixel’. Select and choose ‘I update my website’s code’.
Find Your Website’s Header Code
Locate the header code for your website. Paste this copied base code just above the closing head tag </head>.
Click on ‘send test traffic’. It can take a few minutes but wait to confirm that your pixel is ‘active’. Your pixel base code has been installed.
Select an Event
Locate the pixels tab in Events Manager. Click ‘set up pixel’, ‘manually install the code yourself’, and ‘continue’.
Click ‘install events’ and select which event you would like to track.
The nine standard events are: purchase, lead, complete registration, view content, search, add to cart, add to wishlist, initiate checkout, and add payment info.
Page Load or Inline Action
You have two options here.
Select ‘track event on page load’ to track when someone lands on a specific page. An example is when a visitor lands on a confirmation page after completing a registration form.
Select ‘track event on inline action’ to track when someone clicks on a call to action button. Some examples include ‘pay’ or ‘add to cart’.
It is optional but recommended to add parameters for the conversion.
Click ‘create’.
Copy and Paste the Event Code
An event code is now generated. Copy this event code.
Decide the relevant pages where this event code should be added.
For page load, paste the event code just below the closing header section of the page. Be mindful not make changes to the base code that was installed.
For inline action, paste the event code between the script texts next to the action you want to track. This could be a button.
Repeat this step for every page that you want tracking to take place.
Your pixel installation is now completed.
Confirm with Facebook Pixel Helper
Search for facebook pixel helper on the chrome web store. Select ‘+ add to chrome’ and ‘add extension’.
Once it is installed, you can click on its popup to confirm that your pixel is detected.
This confirms that your installation was successful. You can now begin to create ads with your pixel.
We shall move on to create and install Google Adwords tag for your website. (please link to ‘jump to Google AdWords tag’ from opening paragraph.)
Google Adwords
For the AdWords tag, you need
Your website
The ability to update your website’s code
An AdWords account
What is an AdWords tag
The AdWords tag consists of a global site tag and an optional event snippet.
The global site tag has to be installed on every page of your website. The event snippet is to be installed only on the site pages that you would like to track.
Set Up Tag
Sign in to your Google AdWords account and locate your tool icon.
In ‘shared library’, click on ‘audience manager’, then on ‘audience sources’. You will see the option for ‘AdWords tag’ amongst the remarketing lists.
Click ‘set up tag’ and refer to step six. Here you can select the kind of data you would like to collect from your tag.
Click ‘select and continue’.
Copy and Paste Your Codes
When the installation screen appears, both your global site tag and event snippet will be generated and ready for use.
Copy the global site tag and paste just above the closing header tag </head> for every page of your website.
For the pages you will track, paste the event snippet code right after the global site tag.
We are done!
When finished, click ‘done’.
A ‘what’s next’ confirmation page will appear. Click ‘done’ again.
You have now successfully installed the AdWords tag on your website.
We hope you found this blog useful. Our next post is on (date/topic).
written byKim M. Pham
Kim M. Pham is a professional Digital Media Strategist based out of Los Angeles, CA currently working at DASH TWO. Kim has worked closely with clients primarily in the music space on campaigns for some of the world’s biggest country artists, including George Strait, Luke Bryan and Shania Twain. Being on the agency side, Kim works with clients to develop media plans that reach intended audiences and support their respective business objectives. She is responsible for the development and management of digital strategy for client brands.
Think you’ve got a fresh perspective that will challenge our readers to become better marketers? We’re always looking for authors who can deliver quality articles and blog posts. Thousands of your peers will read your work, and you will level up in the process.
We use cookies to optimize our website and our service.
Functional Always active
The technical storage or access is strictly necessary for the legitimate purpose of enabling the use of a specific service explicitly requested by the subscriber or user, or for the sole purpose of carrying out the transmission of a communication over an electronic communications network.
Preferences
The technical storage or access is necessary for the legitimate purpose of storing preferences that are not requested by the subscriber or user.
Statistics
The technical storage or access that is used exclusively for statistical purposes.The technical storage or access that is used exclusively for anonymous statistical purposes. Without a subpoena, voluntary compliance on the part of your Internet Service Provider, or additional records from a third party, information stored or retrieved for this purpose alone cannot usually be used to identify you.
Marketing
The technical storage or access is required to create user profiles to send advertising, or to track the user on a website or across several websites for similar marketing purposes.