
When your Facebook advertiser requests that you give them access to your Facebook page so they can create advertisements for you, it may seem like a daunting task. However, it can be a lot easier than you think. Once you complete this process, your advertiser will be able to upgrade your page, upload advertisements directly, and make your life a whole lot easier. By following these simple steps, you will have the task completed in no time.
Step 1: Use Facebook Business Suite or Meta Business Manager
Facebook has now centralized most business tools under the Meta Business Suite (formerly Facebook Business Manager). If you haven’t already, set up a Business Manager account at business.facebook.com. This platform is where you’ll manage your Page, ad accounts, and permissions.
Why Use Meta Business Manager?
- Centralized Control: Manage all assets like Pages, ad accounts, and Instagram profiles in one place.
- Enhanced Security: Assign roles with specific permissions, ensuring no unnecessary access is granted.
- Easy Collaboration: Add agencies or partners quickly and monitor their activities.
Step 2: Grant Access to Your Facebook Page
Follow these steps to grant your agency access to your Facebook Page:
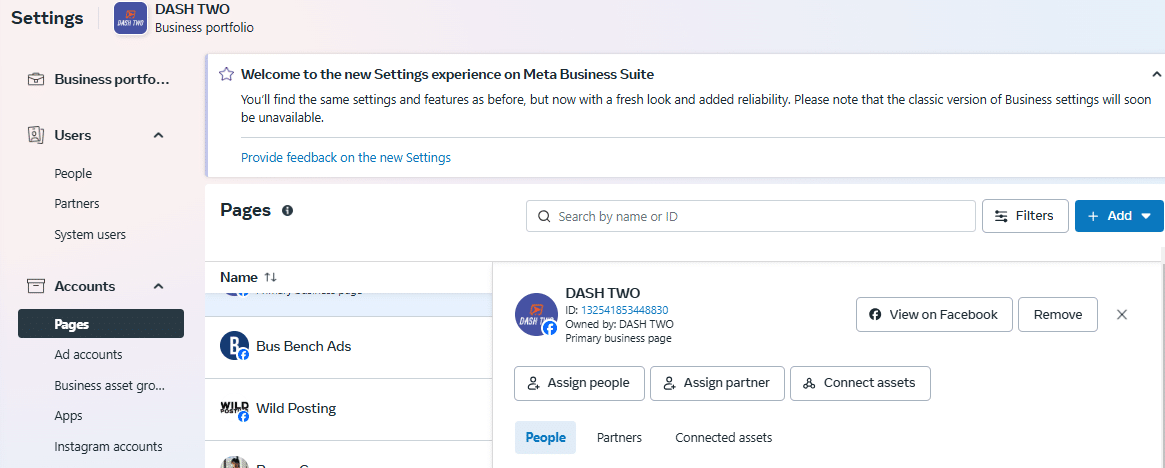
- Go to Meta Business Suite: Log in to Meta Business Suite.
- Navigate to Business Settings: Click on the settings icon in the left-hand menu and select “Business Settings.”
- Find Pages: Under “Accounts,” click “Pages.”
- Select Your Page: Choose the Page you want to provide access to.
- Assign a Partner: Click “Add” and select “Assign Partner.”
- Enter Business ID: Request your agency’s Business ID and input it here.
- Set Permissions: Choose the appropriate level of access, such as:
- Admin Access: Full control, including adding or removing roles.
- Content Creator: Post on behalf of the Page.
- Advertiser: Create and manage ads but cannot edit Page settings.
- Save Changes: Confirm and save your settings.
Step 3: Grant Access to Your Ad Account
To manage your ads, the agency will need access to your Ad Account:
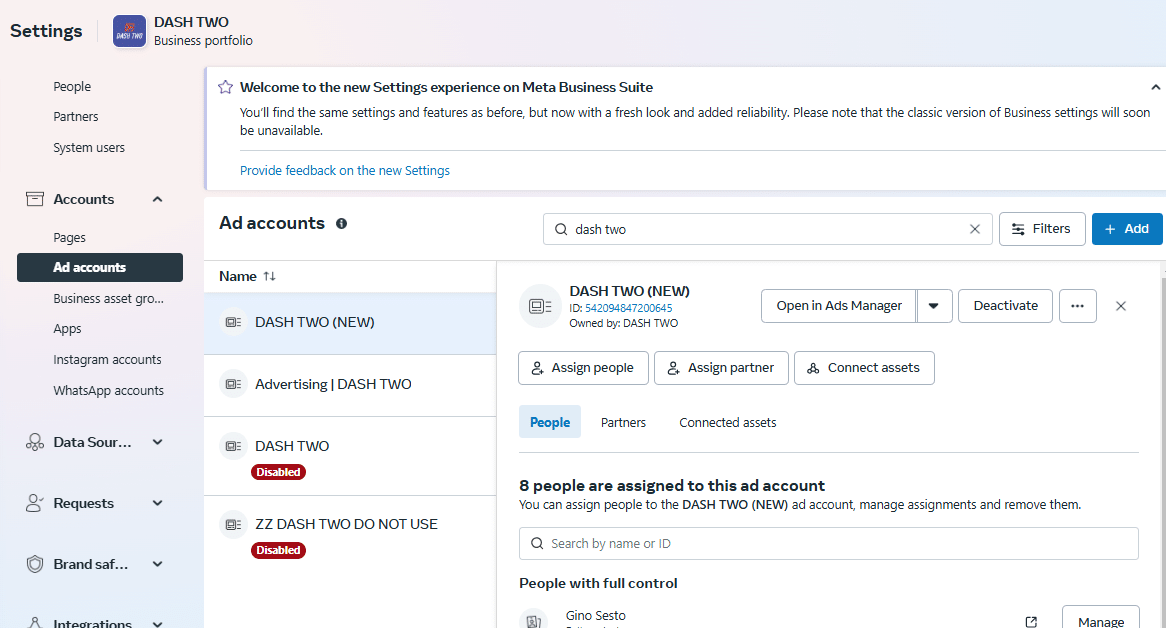
- Go to Business Settings: In Meta Business Suite, navigate to “Ad Accounts” under “Accounts.”
- Select the Ad Account: Choose the ad account you want to share.
- Assign Partner: Click “Add” and select “Assign Partner.”
- Enter Business ID: Provide the agency’s Business ID and input it.
- Set Permissions: Assign roles such as:
- Admin: Full control of campaigns and billing.
- Advertiser: Can create and manage campaigns but cannot manage billing.
- Analyst: View-only access to performance data.
- Confirm and Save: Finalize the access request.
Step 4: Ensure Two-Factor Authentication
Facebook now requires two-factor authentication (2FA) for accounts managing business assets. Ensure you and your agency have 2FA enabled to avoid interruptions. Here’s how:
- Go to Security Settings: In your Facebook account, navigate to “Settings & Privacy” > “Security and Login.”
- Enable Two-Factor Authentication: Follow the prompts to add an authentication method, such as an authenticator app or text message.
- Verify Agency Compliance: Ensure your agency’s team members also enable 2FA.
Step 5: Monitor Activity and Permissions
It’s essential to keep an eye on who has access to your assets:
- Check Regularly: Periodically review assigned roles in Meta Business Suite under “People” and “Partners.”
- Remove Unnecessary Access: Revoke permissions for anyone who no longer requires access.
- Audit Activity: Use “Activity Log” to monitor changes and actions taken on your assets.
Best Practices for Agency Collaboration
- Use Contracts: Clearly outline roles and responsibilities in your agency agreement.
- Limit Permissions: Assign only the necessary permissions to minimize risks.
- Communicate Regularly: Maintain open communication with your agency to align on goals and expectations.
- Request Reports: Ask for periodic performance reports to stay informed about progress.
Wrapping Up
Providing agency access to your Facebook Page and ad account is straightforward with Meta Business Suite. By following these steps and best practices, you can ensure a secure and productive collaboration with your agency while maintaining control of your assets. If you have questions or need further assistance, feel free to contact DASH TWO for expert guidance.